Monday, March 26, 2018

PLAYING WITH PRESET SHAPES

PLAYING WITH PRESET SHAPES


This Tutorial was written for those that have a working knowledge of PSP.


Please do not copy it in anyway or claim its as your own.


Any resemblance to any other tut is purely coincidental.


This Tutorial was written on March 26th,2018


The tutorial was written and Created by Chiqui
For This Tutorial I used PSP X2


SUPPLIES


Tubes of choice~I used the fantastic art work of Rosalys is a free tube.

You can found
here

Don't forget use a copyright if you use her tubes


Filter Italian editor Effect phantasm


Font of choice


Drop Shadow usually V2 H2 30 5 black


Mask of your choice


Texture of your choice. you can get some beautiful textures in

Devianart.com


Word Art from Me (right click and save

Let's get started

Open your mask and minimize 


Open a new raster layer 800 x 800 white background.


Select 2 colors from your tube and create a gradient


Go to your preset shapes

choose one that you like

and draw  in your raster.

Keep this like a vector.


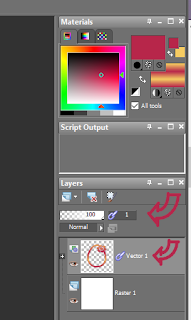
in your palette click in the layer link toggle

This is for link your layers and they move together


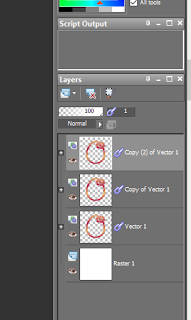
Duplicate your vector twice


you should have something like that:


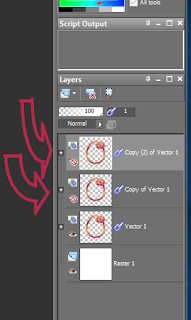
Close the eye in the other copies

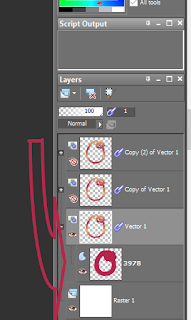
your palette should look like this:


Click on your original raster and rename this : base


Click on the button + in your raster layer

Then you can see other raster below like this:

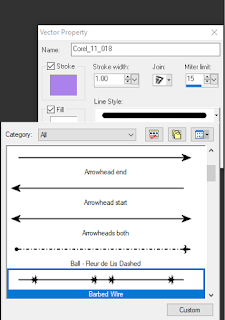
right click  on this layer  and you can get a Menu

Click on properties

Here you can change width, color, line.


Deactivate  the stroke - ok

(here appears activate just click and deactivate stroke)

Click in the - sign of the layer and right click

Convert to raster layer.

Now we click in the first copy of our layer. 

Click on the button + in this raster layer


right click in the layer below 

go to properties

this time we are going to  deactivate the fill button

now change  the line for one of your choice


Change the stroke width to 4.


Click in the - sign of the layer and right click

Convert to raster layer.

Now:

Duplicate all layers (Shift+Ctrl+d)

In this new raster:

delete the white background.

right click - merge visible.

You should have 2  raster like this:


 copy your second raster and paste to the 

original raster and position above your base raster.

Now in your palette selection a lighter color

in your foreground.

(this is only for apply when you use the filter)

Remember you are  in the layer above the base, the one you copy.

Apply the effect Italian Editors - phantasma

with this settings:


back to your base layer

With your magic wand click inside of your shape

Selections-modify-expand by 2

copy and paste your texture

Selections-invert-delete

arrange your texture below the base.

You can use some gradient too for fill the middle of your shape

adding a new raster layer below instead of .

Go to your top layer

Copy and paste  your tube 


Erase the parts out of your shape

Duplicate the tube

in the copy  apply blur - Gaussian blur-10

Change properties to overlay.

Click in your write background

copy and paste a texture of your choice.

or fill a new layer with a gradient.


Layer-new mask layer- from image

Choose the name of your mask - source luminance


then go to layers-delete-yes,  then merge group. 

Copy and paste my word art or other of your choice.

and its done!

Time to  put your copyright and 

the name or phrase that you like .


Wednesday, March 21, 2018

FTU-HAPPY EASTER

FTU - HAPPY EASTER


This Tutorial was written for those that have a working knowledge of PSP.

Please do not copy it in anyway or claim its as your own.
Any resemblance to any other tut is purely coincidental.
This Tutorial was written on March 21th,2018
The tutorial was written and Created by Chiqui
For This Tutorial I used PSP X2

SUPPLIES


Tubes of choice~I used the fantastic art work of Alehandra Vanhek She's a licensed artist from PSD and you need to buy for use:

PICS FOR DESIGN
Filter Cybia-Screenworks (optional)

Font of choice

Drop Shadow usually V2 H2 50 black
 Scrap Kit FTU I used by Dreamworld designs called

*Easter*

You can visit the page and download

HERE
Please leave a thank you, this will be appreciated


Mask by Miztequees No. 246 you can found here

Word Art from Melissa Here
Please leave some love when visit and download.

Lets star:
Open your mask and minimize.
Open a New raster layer 800x800 pixels white background
Copy and paste paper 6
Layers-New mask layer-From image, choose mask source luminance checked 
then go to layers-delete-yes,  then merge group. look my tag for reference.

(note: this is the way you work with masks always
remember is merge group NOT including the background)
resize your mask to 115

ok.
Resize Frame 8 to 60%,copy and paste as a new layer
Use your magic wand inside of the frame go to selections-modify expand-6
copy and paste paper 2, arrange below the frame .  Keep selected.
Paste your close up tube, mirror and move off to the left a bit,
 Selections invert-delete
Click in the paper layer and use delete again.
selections - none
now click in your close up tube and apply
Cybia-screenworks - fine rule with this settings:


Again click inside your frame
click on your tube
copy and paste element 135
Selections invert - delete
selections none

Click on your frame and duplicate
in your original frame apply
Adjust - Blur-Gaussian blur- 10

Resize element 36 to 50%, paste on the right in middle of the frame
Drop shadow 2-2-50-5


 Resize element 98 to 30% paste on the right side look my tag for reference
Resize element 109 30% paste on the right side  of the tag

Resize element 127 to 50% and paste below all layers to the
left side, duplicate - mirror position as you like.
Resize element 133 to 50% mirror, and position at the left side bottom of the frame
Duplicate - in the original use  adjust-blur Gaussian blur-10
 Resize element 54 to 50%, and position at the right side bottom of the frame
Duplicate - in the original use  adjust-blur gaussian blur-10.
Resize element 134 to 50% and position in the bottom left side
Resize  element 132 to 60% move at the bottom of the frame
Change properties to overlay.

Resize element 78 to 70% put to the right side at the bottom.
Resize element 24 to 30% and put on the right side  look my tag for reference
Resize your tube  and paste as a new layer
position as you like  

Duplicate your tube use adjust blur Gaussian blur-10
Change properties to soft light.
Add other elements if ypu like.
Now we are going to work with the word art.
Open your word art shift+D
close the original.
Select 2 colors for a gradient
Selections all selections float-defloat
fill the letters with your gradient
Apply the cybia screenworks-fine rule
Go to effects 3D-inner bevel with this settings:
selections modify expand by 2
layer new raster layer
arrange this layer below the original
fill with white
selections none
merge both layers
copy and paste to  your tag
resize to 60%
Position where you like
Add a drop shadow.
Close the white background
 click in other layer and merge-merge visible
Now its time to add your copyright and name
and it's done!



Tuesday, March 20, 2018

FACE TIME LINE USING FILTER TRAMAGES

FACE TIME LINE USING FILTER TRAMAGES

 This Tutorial was written for those that have a little knowledge of PSP.
Please do not copy it in anyway or claim its as your own.
Any resemblance to any other tut is purely coincidental.

The tutorial was write by Chiqui  March 19th.2018
For This Tutorial I used PSPX2.

  Tramages is a free filter

That you can use in many ways

for add some nice effects to your banners or tags.


SUPPLIES
A Tube of your choice: I am using
the fantastic work of ALEX
PRIHODKO
You need  to buy the tube and get a license

Font of your choice

Filters:

Trameges - Glass
Tramages - Pool shadow
Tramages - quilt
Tramages - waffle
Lets start:
Open a new layer 851x310 pixels.
This is the size for a Facebook banner
select 2 color from your tube and convert in a gradient.

Fill the raster with this gradient.

now apply Tramages - glass with this  settings:

(note: some times  all effects of a filter doesnot appears in your list. then you need to use
Filters unlimited 2.0 (free too) and import the filters effects  you can see a tutorial HERE)

Now go to effects - edge- enhance

Apply effects-Artistic effects halftone with this settings


Now go to Tramages - pool shadow with this settings:


Apply Tramages quilt with this settings:


Apply Tramages waffle with this settings:


Now copy and paste your tube and position in the left side
duplicate the tube
in the copy apply adjust-blur-gaussian blur -10
change the properties to overlay

layers - merge- visible

Now for the border

layer new raster layer
fill with a color of your choice.
Select all- modify-contract by 8
delete
selections - none.

Keep in this layer
go to square shape tool with this settings:


foreground - color lighter than the use in the border
Background null

Looking for a shape line of your choice this time I used
diamonds


Draw a square inside of the border you create before.

Merge down both raster.

Add a drop shadow
Effects 3d - drop shadow 2-2-50-5

Merge all

now  its time to add your copyright
your name or the words of your choice.
Save as a png
here my result


Monday, March 19, 2018

HOW TO USE FILTER TOADIES

HOW TO USE FILTER TOADIES

This Tutorial was written for those that have a little knowledge of PSP.

Please do not copy it in anyway or claim its as your own.

Any resemblance to any other tut is purely coincidental.

The tutorial was write by Chiqui  March 19th.2018
For This Tutorial I used PSPX2.

 Toadies is a free filter

that performs a big variety of effects

for your banners and tags, like

distortion, blur, 3D designs, noise.

Today we are going to work with 3

effects in a Face time template.


SUPPLIES
 
A Tube of your choice: I am using
the fantastic work of Verymany.
Ypu need  to buy the tube and get a license
HERE
 
Font of your choice
Filters:

Toadies - Picasso's Another world
Rasterline
Weaver
 
Lets start:
 
Open a new layer 851x310 pixels.
This is the size for a Facebook banner

Select 2 colors from  your tube


And create a gradient
Fill your layer with this gradient
Now go to toadies -Picasso's Another World with this settings:

Apply Toadies - Rasterline with this settings


Apply Toadies - weaver with this settings:
Apply effects edge effects - enhance
with ypur move tools, move a little the image to the right.

Duplicate this layer
In the copy :
Image-mirror
Image - flip
 
Now  you have  some like this.
 
Layers merge visible

Layer new raster
arrange down of the first one
and fill with a contrast color of your choice

Copy and paste ypur tube and position
in the right side
drop the opacity to 43


Again copy and paste your tube 
Image - Mirror
Position this time to the left side.
Duplicate this tube
Go to Adjust - blur -Gaussian blur-10
now in this copy change the properties to overlay


Merge visible all layers

Layers New Raster layer
Fill with the same gradient you use before
Selections all- Modify contract 8

delete
selections- none

Change the properties to overlay.

now  its time to add your copyright
your name or the words of your choice.
 
Save as a png
 
here my result


Sunday, March 18, 2018

WORKING WITH TEXT IN A DIFFERENT WAY

WORKING WITH TEXT IN A DIFFERENT WAY

  
This Tutorial was written for those that have a little knowledge of PSP.

Please do not copy it in anyway or claim its as your own.

Any resemblance to any other tut is purely coincidental.
The tutorial was write by Chiqui  March 18th.2018
For This Tutorial I used PSPX2

SUPPLIES
A FAT font of your choice
I used Magical Mistery Tour Font
Ypu can found this free font here

Filters:

Eye Candy 4000 - glass
Xero-Frittilary filter


Lets start:

Open a New layer transparent 650x 300 pix
 Select 2 color for ypur Foreground and Background
in this case i selected white and pink

Select your text tool and write something
In this case I wrote my name but you can use
this with any short phrase or name.

Go to layer -convert raster to layer
(this is for convert the vector in a layer)

Now selection-All
Selection - Float
Selection - Defloat
Selection modify - Expand by 2

 Layer - New raster layer
arrange the layer down the first one
and click on it  to be sure you are in the right layer.
Fill this layer with your background color (pink in my case)


Selections none.
Now click in the first layer and go to
merge down.
copy  and paste as a new imagen
right now ypu should have 2 images like this:


minimize the original and  We are going to work in the copy:

Selections-all
selections float
Selections defloat
Selections modify contract by 2
layers-New layer
Fill this layer with a contrast color
(other way to do this is: use your magic wand
click inside each letter, then modify contract-by 2)

Keep Selected
then apply
Effects-Eye Candy 4000 - Glass
with this settings:
keep selected
Apply Effects Penta.com - color dots
with this settings:
selections- Select - none
merge - visible.

Minimize this image and click in the original imagen

Now We are working on the original imagen.

Selections all
 Selection - Float
Selection - Defloat
Selection modify - Expand by 6

Layer new raster layer
arrange down the first one,
fill with the color in the border. In my case was white

Keep selected
Go to 
Effects - Xero - fritilary with this settings
selections all
merge visible
Now we are going to get the both imagen together
maximize your copy
right click and copy imagen
Go to your original imagen
paste as a new layer.
Now with your  move tool
arrange the image in the original that
get exactly in the middle.

Add a drop shadow
like this:
(Note this image is from other tutorial but I use this settings)

Merge visible
Repeat the drop shadow.

This is my result:


And its done!

Ypu can use other effects you like it
This is only a guide to how you can do a 
text different.


Saturday, March 17, 2018

USING PRESET SHAPES AND FILTER DSB-LINNEAR TRANSMISSION

USING PRESET SHAPES AND FILTER
DSB-LINNEAR TRANSMISSION


This Tutorial was written for those that have a little knowledge of PSP.

Please do not copy it in anyway or claim its as your own.

Any resemblance to any other tut is purely coincidental.
The tutorial was write by Chiqui  March 17th.2018
For This Tutorial I used PSPX2

SUPPLIES
Tubes of choice~I used the fantastic art work
Michi art
 You need a license for use this tube. You can find the tube and the License

Filters:

DSB - LINNEAR TRANSMISSION

Xero-Frittilary filter

Font of your choice

Let's get started

Open a new imagen 700x 700 Transparent background

select 2 colors that combine with your tube
for your foreground and background 

Go to preset shapes and choose a shape
that combine well with your tube like this:

Draw your shape as bigger as ypu can past your tube  inside or almost  inside like this:

Layer - Convert to raster layer.
with ypur magic wand with this settings:

Select inside of the shape and apply
Xero-Frittilary filter  withi this settings
selections - None
Effect- 3D-Dropshadow


(I copy the imagen from other tutorial,
because is the same settings)

Duplicate the raster layer of the shape.
Close the eye of the copy and click on the original shape
Apply Filter DSB-Linnear Transmission
With this settings:


Duplicate the original raster again
and apply   this filter again

Duplicate this layer again
and Adjust- Blur-Gaussian blur - 11

you should have some lime this:


Note: This tutorials are basically
for you learn how to use filters, layers and I  try
to keep them quick and simple.
Click in the first layer
Copy and paste your tube and position in middle
of the shape
Apply the same drop shadow we apply to the shape.
 
Add your name

Add your copyright
Save as a .PNG

and its done!!!!

My try: