Translate

Showing posts with label Jose Cano. Show all posts

Saturday, June 9, 2018

RED AND WHITE WINE

RED AND  WHITE WINE
This Tutorial was written for those that have a working knowledge of PSP.

Please do not copy it in anyway or claim its as your own.
Any resemblance to any other tut is purely coincidental.
This Tutorial was written on Jun 9th,2018
The tutorial was written and Created by Chiqui


For This Tutorial I used PSP X2


 SUPPLIES


Tube  and close up of your choice


I am using the awesome artwork of Joe Cano.


You need a license to use this tube, do not use without a license.


You can find this tube at his  store  HERE

a blend image of your choice
I used A vienesse Gallery by pingallery


you can download this filter (3 parts)  Here


Font of choice
I used Brilliant Signature font  free Here


Drop shadow is usually V-2 H-2 Black, 50, 5, use what you prefer If need it


  Let's get started


Open a new image 851 x 310 pixels


Transparent Background
Choose 2 colors of your tube and create a gradient
with this settings:
Fill your layer with this gradient
Adjust - blur- Gaussian blur 35

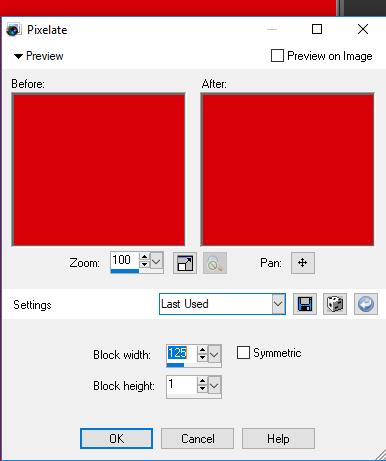
Effects - distortion effects - Pixelate with this settings:


Duplicate this layer
Apply in this layer the filter
 ECWS Halftone/ HexOrder2
with this settings:
Change the blend mode to overlay


 Layers - Merge - merge visible

Duplicate and apply
ECWS filter
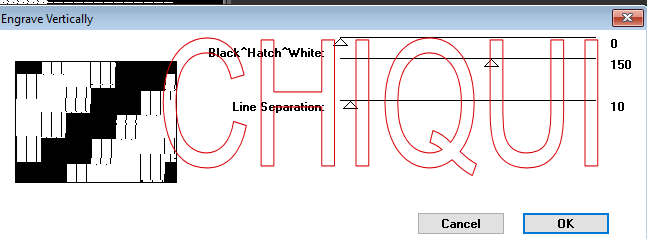
ECWS /Engrave Vertically with this settings:

change the blend mode to soft light

Resize your  image, copy and paste.

You should have something like this:

Change the blend mode to screen or other blend that fit better with your image.

Copy and paste your close up to the right side
Change blend mode to screen or other to  fit with your tube.

copy and paste your tube.

Position in the left side

Duplicate
Adust - blur Gaussian blur
change blend mode to overlay

Now we are going to add a border.

Layer new raster
fill with a color of your choice
Selections all selections modify contract by 10
delete
layers new raster
fill with a constrast color
selections all selection modify contract by 5
delete

tighme to add your copyright
Save as a .png.
Add your name


and it's done!  yay!


Sunday, April 8, 2018

MISFITS ROCKS

This Tutorial was written for those that have a working knowledge of PSP.
Please do not copy it in anyway or claim its as your own.
Any resemblance to any other tut is purely coincidental.
This Tutorial was written on April 8th,2018
The tutorial was written and Created by Chiqui
For This Tutorial I used PSP X2

SUPPLIES
Tubes of choice~I used the fantastic art work of Jose Cano.  He is a licensed artist and you need to buy for use:
A Fat Font of choice  
I used BLACK OAK STD FONT
You can download this font Here

Other font of your choice
 I used A&S extreme font you can download Here

Eye candy impact 5 Extrude


Mask By Vix No. 409

You can get here:

http://www.freewebs.com/vixpsp/masks.htm


Let's get started


Open a new imagen 800 x 800 white background we can crop if need it when we finish.
Open and minimize your mask on psp.


go to your background and add a new layer

Fill with a color of your choice

Layers-New mask layer-From image, choose mask source luminance checked then go to layers-delete-yes, then merge group. look my tag for reference.

Add a drop shadow.

Write the Word MISFITS ROCKS or other you want in a Fat Font Foreground White Background a color of your tube.

Convert to raster layer and add a drop shadow. 

With your magic wand settings Add(shift) tolerance and feather 0 click on each letter then selections modify expand by 1


Go to effects 3D effects Inner bevel with this settings:


 Selections none.

Go to eye candy impact 5  extrude and apply this settings:


Small offset 45 degrees and:
 Add a drop shadow
Copy and paste a tube of your choice and position over the letters.

add a drop shadow to the tube and merge down with the word
NOT WITH THE MASK

now Selections all selections float selections defloat this layer

Add a layer

On this layer go to selections modify expand by 8 or 10 your choice

Keep selected.

Go to gradient glow eye candy impact 5 Factory default and apply this settings:


Changes the  colors to a color from your tube.

Selections none.  you will see a "aura" around letters and doll.

Duplicate this layer twice you should have 3 layers. Rename them glitter 1
Glitter 2 and glitter 3

Go to  Glitter 1 and go to adjust add/remove noise

Add noise monochromatic checked  random checked - noise 71

Go to Glitter 2 repeat the same but change noise to 81

Go to Glitter 3 repeat the same but change noise to 91

Now add your name  or elements if you want

Add the copyright info.
Crop if need it

Close the white background  and save as a .PSD


For animation :
Close Glitter 2 and 3.. then  go to edit copy special, copy merged.  Open your animation shop and paste as a new image.

Back to psp close glitter one and open glitter 2.  Go to Edit copy special... copy merged.  Go to your animation shop and edit paste After current frame.

Back to psp close Glitter 2 and open glitter 3.  Go to edit copy special copy merged.  Go to your animation shop and edit paste After current frame.

Now you have 3 frames on animation shop.
Because the poor optimization in animation shop I have to 
keep the white background when I imported to.

Save as a gift