Translate

Tuesday, April 2, 2019

☆ :: CT Tag for Alicia Mujica :: ☆

NEW products in the store
★This is such an amazing tube ~Axell y Blanche Abril
by Alicia Mujica 2019" ~ You need a Licence to use. ©Alicia Mujica Art★ Kit used on this tag is
"Set Sweet Moments" by Alicia Mujica 19 clip- art high quality png 300 dpi ★ All right reserved - Licensed needed
If you are interested in her art for comercial use, please contact her @ aliciamujica@aliciamujicadesign.com
★You can have the Tube and kit as PU/CU★
❀ Tube: https://aliciamujicadesign.com/…/767-axell-y-blanche-abril-…
❀Instagram de Alicia Mújica: https://www.instagram.com/mujicaalicia
❀❀ ❀❀ ❀❀ ❀❀ ❀❀
❀ Tagger:
Adriana Carrillo
https://www.instagram.com/mmmadoxxhotmail/
https://chiquipsp.blogspot.com/
❀❀ ❀❀ ❀❀ ❀❀ ❀❀


 #AliciaMujica ·•· #artaliciamujica ·•· #papeleriabonita ·•· #ilustradora ·•· #Instagram ·•· #instaart ·•· #instaartist ·•· #invitacioneseventos ·•· #bodas ·•· #merchandising ·•· #socialnetwork ·•· #feelthemagic ·•· #ilustradora ·•· #ilustrador ·•·#digitalart ·•· #digitalartist ·•· #sketch ·•· #artist ·•· #artistic ·•· #drawing ·•· #artwork ·•·#pandas ·•· #Clipart ·•·#scrapbooking ·•· #mom ·•· #moms ·•· #diadelasmadres ·•· #mothersday #scrapbooking #scrap #scrapbook


Monday, March 18, 2019

CT ALICIA MUJICA EASTER

✿ ✿New CT Tags for Alicia Mujica ✿ ✿
PTU Tag CT beautiful Tube Ainara by Alicia Mujica 2019
Kit Easter by Alicia Mujica 2018
NEW!!!! You can have the Tube and kit as PU/CU
TUBE:https://aliciamujicadesign.com/…/749-ainara-2019-by-alicia-…
SCRAPKIT:https://aliciamujicadesign.com/…/496-kit-easter-by-alicia-m…
INSTAGRAM:https://www.instagram.com/mujicaalicia/


Sunday, March 3, 2019

CT FOR ALICIA MUJICA


CT Alicia Mujica
PTU Tag CT beautiful Tube Lori by Alicia Mujica 2019
scrapkit Easter Night Bunnies by Alicia Mujica 2019
NEW!!!! You can have the Tube and kit as PU/CU .
All on sale in Alicia Mujica Designs
Tube: https://aliciamujicadesign.com/…/752-lori-by-alicia-mujica-…


Scrapkit:https://aliciamujicadesign.com/…/748-easter-night-bunnies-b…


Wednesday, November 7, 2018

AUTUMN SPLENDOR

 AUTUMN SPLENDOR


This Tutorial was written for those that have a working knowledge of PSP.
Please do not copy it in anyway or claim its as your own.

Any resemblance to any other tut is purely coincidental.

This Tutorial was written on Nov. 6Th,2018

The tutorial was written and Created by Chiqui


For This Tutorial I used PSP X2


SUPPLIES

Close up of your choice

I am using the fantastic work of Alehandra Vanhek

You need a license to use. You can buy here

An Autumn landscape blend image of your choice:

I used one I found here

Font of choice I used Stardust Adventure font free Here


Sparkles (no animated) of your choice
any element of your choice

Filters:

Filter Factory Gallery H - Jumble, Alias Blur 
 VM Natural - Lightsplash


Lets start:

Open an image 851 x 315 pixels Transparent
Foreground  #fc6f00
 Background #181617
or 2 colors of your choice
Make a Gradient with this settings:


Flood fill your layer with this gradient
Selections
Selections all
copy and paste your tube into selections
Selections none.

Now apply
Effects Plugins Filter Factory Gallery H - Jumble, default settings.


 and
Effects Filter Factory Gallery H - Alias Blur, default settings.


Duplicate the layer
and apply

Effects Plugins   VM - Lightsplash, default settings.


Copy and paste your landscape picture
Change the blend mode for one of your choice
I used hard light for the contast with my tube.

Copy and paste your tube
duplicate
Adjust blur Gaussian blur  by 10
change blend mode to overlay

Merge visible

Layers new raster layer
fill with a color of your choice
selections all
modify contract by 10
delete
selections none
layer new raster layer
fill with a dark color
selections all
selections modify contract by 2
delete
selections none.

Use any embellisment you want
 I use a rectangular preset shape
line style ball fleur de lis width 2 
foreground black
background null.

Merge visible

Time to put the copyright 
and your name!


AVATAR
Open a new image 200 x 200
Go to your tag close off the tube, copy merged, paste, resize to 60%, adjust 
how you like, 
Do the same steps for border like the banner
Merge all crop
 
add copyright


Wednesday, September 26, 2018

AUTUMN ELF


AUTUMN ELF


This Tutorial was written for those that have a working knowledge of PSP.

Please do not copy it in anyway or claim its as your own.

Any resemblance to any other tut is purely coincidental.

This Tutorial was written on Sept. 26Th,2018

The tutorial was written and Created by Chiqui


For This Tutorial I used PSP X2


SUPPLIES

Close up of your choice

I am using the fantastic work of Verymany

You need a license to use. You can buy here

An Autumn landscape blend image of your choice:

I used one I found here

Font of choice font free Here


Sparkles (no animated) of your choice
any element of your choice

Filters:


- Mehdi/Waby Lab 1.1:
- L & K´s/ Andreas

- Flaming Pearl/Flood

- Alf´s Border FX/Border Film

- Transparency/Eliminate white

- MuRa´s Filter Meister/Copies

-Photo effexx Scanlines

- Nik Software Color Efex pro 3.0 Complete/Cross Balance/Tungsten To Daylight

Lets start:
Open an image 851 x 315 pixels Transparent
Foreground a light color of your tube
Background a dark color of your tube.
Make a Gradient with this settings:

Apply Mehdi/Wavy lab 1.1 with this settings:


Duplicate

Apply effect L & K/L & K´s Andreas with this settings:


Apply Effects - Geometric Effects skew with this settings:


change blend mode to overlay or one to works better with your colors


Merge visible


Layer new raster layer
Fill with white


Apply this mask I found in Pinterest. here

If you know the author please write me.


Copy and paste your landscape blend image


And apply Effect Flaming pear flood with this settings:


Layer new raster layer
Fill with white


Apply effect Alf´s Border FX/Border Film with this settings:


(Note: this settings depend of colors you are using and you need to change until you get the color you want.)


Apply Effects Transparency - Eliminate white.


Effects - Image effects - offset with this settings:


Copy a paste sparkles of your choice position to the left side
Duplicate
Image mirror


ok. Now click in your last layer (the one we merge the bottom layer) and duplicate
Arrange - bring to top


Effects - geometric effects - perspective horizontal with this settings:


Image mirror

Apply the geometric effect again Then, apply effect distortion effects wave with this settings:


Effects Mura meister's copies with this settings:


Effects - reflection effects - rotating mirror with this settings:


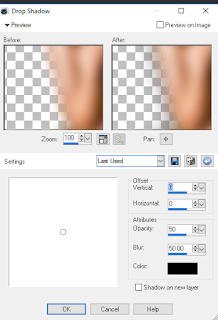
Apply Effects 3d Effects - Drop shadow with this settings:


copy a close up of your tube and position on the left side

Change the blend mode to overlay and drop the opacity to 90%


Copy and paste your tube

Duplicate

Blur Gaussian blur by 10

Change blend mode to overlay.


Image Add Border 1 px. Dark color


Image Add Border 1 - 5 px. White color

Image Add Border 1 px. dark color


Image Add Border 20 px. white color

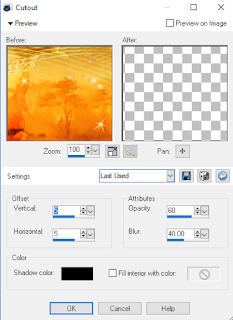
with your magic wand select this border


Effects 3d cutout with this settings:


No deselected


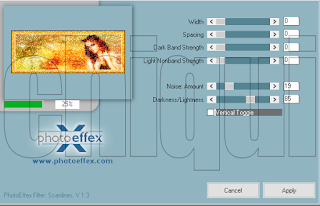
Photo effex scanlines with this settings:


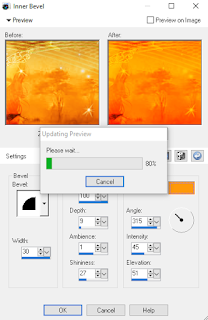
Effects 3d effects inner bevel with this settings:


Repeat Photoeffex scanlines

selections none
Image Add Border 1 px. Dark color

Resize to 851 x 315 since when we create borders
we lost the initial dimensions.

Add your copyright

Add your name.


AVATAR
Open a new image 200 x 200
Go to your tag close off the tube, copy merged, paste, resize to 60%, adjust 
how you like, 
Do the same steps for border like the banner
Merge all crop
  add copyright


Monday, September 10, 2018

BYE BYE SUMMER

BYE BYE SUMMER


This Tutorial was written for those that have a working knowledge of PSP.
Please do not copy it in anyway or claim its as your own.
Any resemblance to any other tut is purely coincidental.
This Tutorial was written on August 12Th,2018
The tutorial was written and Created by Chiqui

For This Tutorial I used PSP X2
SUPPLIES
Close up of your choice
I am using the fantastic work ofVerymany
You need a license to use. You can buy here
An Autumn landscape blend image of your choice:
I used one I found here
 Font of choice
I used
Dalmatins
 font free Here


ECWS Filter   You can download Here
 
Lets start:
 
Open an image 851 x 315 pixels Transparent
 Foreground a light color of your tube
Background a dark color of your tube.
Make a Gradient with this settings:
 
 
Adjust blur Gaussian blur by 30
 
Duplicate this layer
 
Apply 
ECWS Halftone/ Diagonal 4X4
with this settings:
 
 
Change the blend mode to soft light 

Copy and paste the blend landscape of your choice

position where you like and change the blend mode
for one you like it.

Merge visible

Duplicate

Apply
ECWS Halftone/ HexOrder2 with this settings:

Change the blend mode to soft light
Copy and paste your tube
position in the middle of your canvas a little to the left
Change blend mode to screen
Copy again your tube
Position in the right side
Duplicate
Adjust blur Gaussian blur by 10
Change blend mode to overlay
New raster layer
Fill with a color of your choice
Selections all selections modify contract by 10
delete
selections none.
change the blend mode to screen


Add the copy right
Add your name
and its done!


Sunday, August 26, 2018

FACE TIME FREEWAVE FILTER

FACETIME FREEWAVE FILTER


This Tutorial was written for those that have a working knowledge of PSP.
Please do not copy it in anyway or claim its as your own.
Any resemblance to any other tut is purely coincidental.
This Tutorial was written on August 12Th,2018
The tutorial was written and Created by Chiqui

For This Tutorial I used PSP X2
SUPPLIES
Close up of your choice
I am using the fantastic work of Alehandra Vanhek
You need a license to use. You can buy here
An Autumn landscape blend image of your choice:
I used one I found here
 Font of choice
I used
Wolfbane Pro
 font free Here


Freware Filter.  You can download here
Let's Start 
Open an image 851 x 315 pixels Transparent
 Foreground a light color of your tube
Background a dark color of your tube.
Make a Gradient with this settings:

Fill your layer with this gradient
Adjust blur-  Gaussian blur by 45
Duplicate
Effects - Freware filter Air Dome with this 
settings:

This settings apply for  Green/brown color.  If your tube colors are different, you need toplay with this settings and get one  better for you.

Change the blend mode to luminance

Merge - visible

Apply effects Freeware - Sinus Waves ( import the file called nsimav) with this settings:


New raster layer

Go to selections tool - custom tool and apply this settings:


Change your gradient to this settings:

Fill the selection with this gradient

Selections none

go to effects freeware - Needles & pin with this settings:


Duplicate - Image - Mirror
Merge down
Change blend mode to Screen
 Copy and paste your blend image
Copy and paste your tube
Duplicate
Adjust blur gaussian blur by 10
change blend mode to overlay

 I added a flower element
Duplicate the element
merge down and change blend mode to overlay
Position above my background then
duplicate
image mirror.

Merge visible

raster new raster layer

fill with a light color of your choice
selections all selections modiy
contract by 10
delete
Selections none

Apply effects texture- blinds with this settings:


with your preset shape tool

rectangle
Background null
Foreground a light color of your choice
Line style diamonds
width 3
Draw a rectangule 
convert to raster layer

go to efects edge effects Find Horizontal

Add ypur copyright
your name

and its done!


AVATAR
Open a new image 200 x 200
Go to your tag close off the tube, copy merged, paste, resize to 60%, adjust 
how you like, 
Do the same steps for border like the banner
Merge all crop
 
add copyright