
PLAYING WITH FUN HOUSE AND CPK FILTERS
This Tutorial was written for those that have a working knowledge of PSP.
Please do not copy it in anyway or claim its as your own.
Any resemblance to any other tut is purely coincidental.
This Tutorial was written on April 4th,2018
The tutorial was written and Created by Chiqui
For This Tutorial I used PSP X2
Materials:
Filters Funhouse, CPK Designs, Lokas filter, Alien Skin Xenofex 2
Tubes of choice~
I am using the art of Alex Prihodko, which can be obtained at here
Mask of your choice
Fat Font I am using Velvenda Cooler font.
Its a free font you can download Here
Let's get started
Open your mask and minimize
Open a New raster layer 800x800 pixels white background
Select 2 colors of your choice and create a gradient with this settings:

(I have this imported to Filter unlimited)
with this settings:

Now apply
 Change the properties of this layer to "Screen"
Go to effects - Xenofex 2 - constelation with this settings:
 Layers - merge - merge visible
Open a new layer 800 x 800 pixels.
White background.
Go to your preset shape tool
Vector size 10
foreground a color of your choice
Background null.
Draw your shape and keep the vector
Duplicate twice
 In the middle raster click on the sign +
 Close the sign +
Funhouse Heinzenberg's mirror
with this settings:


Open a new raster layer and apply the same gradient.
now apply to this layer the effect
CPK designs - CK pegs with this settings:

Go to effects - Xenofex 2 - constelation with this settings:

Minimize this layer
Open a new layer 800 x 800 pixels.
White background.
Go to your preset shape tool
Vector size 10
foreground a color of your choice
Background null.
Draw your shape and keep the vector
Duplicate twice

now in the sub-raster right click for open the
vector properties and change this settings:
In the stroke choose a light color

Go to the top layer and repeat the process
with this settings:
Change the line style to dots or dash

Close the sing +
Convert all 3 layers in raster
Now go to the original raster and apply
Adjust- add/remove noise with this settings:

Apply the same noise to the top raster
Layers - merge - merge visible.
Apply now
Effects - gradient glow
with this settings:


With your magic wand click inside of the shape
selections - modify expand - 1
Copy and paste the background you create before
Selections invert - delete.
Arrange this layer down
Selections none
Again in your shape
Click inside the shape and copy and paste
a close up of your tube.
Selections invert - delete.
Arrange your tube down the shape and change
the properties to Luminance or other of your choice
Layers merge - merge visible
Copy and paste your tube and position to the left.
Go to your background
Layer new raster layer
Fill with a color of your choice
Foreground null.
Size 150 Pix.
Write the phrase or the name of your choice.
Layers convert to raster layer
Select all-Selections float- Selections defloat
Apply the filter Lokas software - Cotton
with this settings:


Go to your background
Layer new raster layer
Fill with a color of your choice
Layers-New
mask layer-From image, choose mask source luminance checked
then go to
layers-delete-yes, then merge group. look my tag for reference.
Now we are going to Add your phrase or name
Select a color from your tubeForeground null.
Size 150 Pix.
Write the phrase or the name of your choice.
Layers convert to raster layer
Select all-Selections float- Selections defloat
Apply the filter Lokas software - Cotton
with this settings:

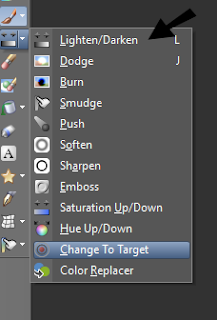
Let's give a touch of color to look
pretty, for this go to the palette of tools, (left side of the PSP) and choose "Change
to target brush" which is like a little circle with a red dot in between
configure like this:

And with a contrasting color in FOREGROUND COLOR of the color palette gives
brush strokes with the mouse where you want to change color.
In the original layer select all-float-defloat
Selections modify - expand by 2
Layer new raster layer
arrange down the original
fill with white color
click in your copy and
layers merge down.
Now add a drop shadow
go to effects 3D effects
drop shadow with this settings
2- 2 - 40 - 5
Add the copyright
Ad your name with a font of your choice
Close the white background
Save as a png.
This is my result:


2 comments:
ME ENCANTOOOO EN LO QUE ME PERDI FUE COMO METERLE LA DOLL A DENTRO
DE LA FORMA? JIJI MUCHAS GRACIAS
Que bonito trabajo amix,saludos
Post a Comment